Posted Fri May 15, 2009 at 12:55 PM PDT by Joshua Zyber
Editor's Note: This week, our HD Advisor takes a break from the usual Question & Answer format to provide a guide to Constant Image Height projection. We'll be back next week with more Q&A, so please keep sending your questions to [email protected]. To browse through previously answered questions, visit the main HD Advisor page. |
 |
No Black Bars EVER!!!
(Well, Almost Never.)
By Joshua Zyber.
Back in my Why Don't the Black Bars Go Away? article, I explained the differences between movie aspect ratios. Some movies are photographed wider or narrower than others. In the early days of cinema, most movies were shot in the Academy Ratio of 1.37:1. Eventually, that ratio was largely phased out from usage in feature films (though it obviously continues to be used for television). Currently, theaters are equipped to project films in our two standard widescreen aspect ratios, either "Flat" 1.85:1 or "Scope" 2.35:1*. Both ratios serve their own artistic purposes, and have continued to be used just about equally for decades. A film's director and cinematographer will choose whichever ratio they feel is most appropriate for the content of their movie.
An HDTV screen has an aspect ratio of 1.78:1. Movies of the 1.85:1 shape should nearly fill that screen. However, any movie with a wider ratio won't fit properly. Obviously, 2.35 is not the same number as 1.78. It's like trying to squeeze a square block into a round hole. (Or, more accurately, a large rectangular block into a smaller rectangular hole.) They're just not the same thing.
The solution to this problem is letterboxing. By shrinking the Scope movie image down in size so that it maintains the same width as the 16:9 screen, it will now fit on that screen. Black bars fill in the empty space above and below the movie picture.
 |
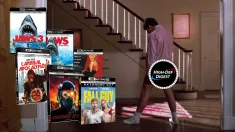
Technically speaking, all high-definition Blu-ray content has the same inherent aspect ratio of 16:9 (1.78:1), matching that of the HDTV screen. Blu-rays are encoded with a resolution of 1920x1080 pixels. Some of those pixels are used for the active movie image, while others may be used for black bars. Nevertheless, as far as the TV can tell, it always receives a 16:9 picture.
Obviously, letterboxing is a compromise. You won't often see black bars in a commercial movie theater. Most theaters (certainly all the good ones) have adjustable screens that can accommodate both 1.85:1 and 2.35:1 movies. Curtains or other forms of masking will be drawn in for one aspect ratio and expanded outwards for the other. When the movie plays, it should fill all of the visible screen. As I'll describe below, that same effect can also be achieved in a home theater with Constant Image Height projection.
(*One semantic note: The theatrical standard for "Scope" projection is actually now closer to 2.40:1. Nonetheless, most people in the film industry continue to call it "2.35:1" out of habit. Such movies may wind up transferred to home video at either a mathematical 2.35:1 or 2.40:1 ratio depending on the studio and the calibration of the telecine used during the film-to-video transfer. The difference between these two numbers is negligible and not worth worrying about. This article will refer to Scope projection as 2.35:1 for clarity.)
Wider is Better
When CinemaScope was invented in the early 1950s, the intent of the process was to provide a wider and more immersive movie image than the standard Academy Ratio movies of the time. Although CinemaScope itself (which had a 2.55:1 ratio) eventually went defunct, other widescreen formats took its place. We still refer to 2.35:1 productions as "Scope" for shorthand. By and large, most filmmakers who choose Scope shooting formats do so for the same purpose, to create a movie image that will be projected larger than Flat 1.85:1 movies. That's why so many "epic" blockbuster-type movies (think 'Lord of the Rings') are composed for 2.35:1, because the directors want to dazzle the audience with wide picturesque landscapes and huge crowd scenes. (That is, of course, not the only artistic criteria for using the 2.35:1 ratio, but it is a very common reason.)
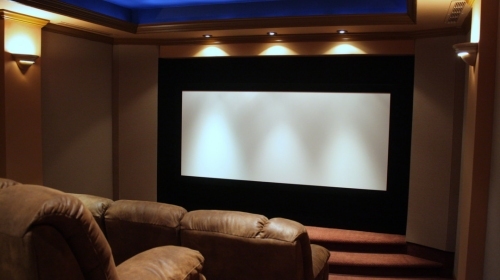
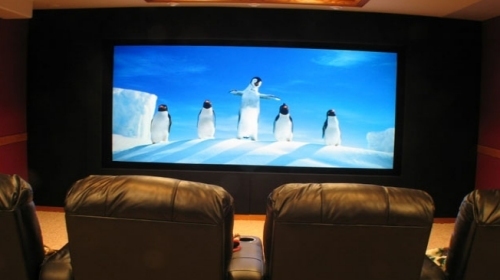
The majority of commercial theaters are designed in what is known as a Constant Image Height (CIH) configuration. Movies of both the 1.85:1 and 2.35:1 ratios maintain the same top and bottom boundaries on the screen. When Scope movies are projected, curtains will open to expand the image width. Thus, Scope movies are displayed larger than Flat movies. The process of letterboxing on an HDTV actually has the opposite of the desired effect. Scope movies are now smaller than Flat movies when viewed at home.
But that doesn't have to be the case. Unfortunately, if you have a standard HDTV, you're pretty much locked into one screen ratio. However, viewers with front projection systems have a lot more flexibility. A growing population of projector owners are installing 2.35:1 screens and implementing Constant Image Height in their home theaters.
On a proper CIH set-up, movies and TV shows with aspect ratios less than 2.35:1 should be pillarboxed onto the center of the screen. If you find the empty space on the sides of the picture bothersome, curtains or masking may be applied to cover it up and absorb any excess light.
 |
As your video content expands from 4:3 to 16:9 to 2.35:1, adjust the masking to expose more of the screen.
 |
Scope movies will occupy more screen space than narrower ratios, as originally intended. The effect can be very impressive.
 |
CIH may be more complicated, and often more expensive, than just using a traditional 16:9 screen, but it arguably (or not so arguably, if you ask me) comes much closer to the true intent of home theater, to replicate the theatrical experience at home.
So, how do we do it?
The Zoom Method
The simplest and least expensive way to fill a 2.35:1 screen is to adjust the projector's zoom so that the sides of the movie image fit the sides of the screen. Any black letterbox bars should spill over the top and bottom of the screen. For narrower content, reduce the zoom so that the top and bottom of the image fill the height of the screen, then draw in the side masking. No special hardware or equipment is needed.
This "Zoom Method" does have a few downsides, though. For one, light spill from the letterbox bars above and below the screen may be visible or distracting. To solve this, add dark masking material around the screen to absorb that excess light.
Of more concern is the fact that enlarging the image size, with the same light output from the projector, will result in a corresponding reduction in brightness on the screen. Wider movies will appear dimmer than narrower movies, because you're spreading the same amount of light around a larger area. Depending on the size of the screen and the room environment, this may or may not be very noticeable. Some viewers will compensate for this by switching their projectors from standard lamp power (in 16:9 mode) to high lamp power (in 2.35:1 mode). Using high power will reduce the lamp's lifespan. Also, viewers with large screens, long throw distances, or aging bulbs may already need the high lamp mode just for 16:9 content, in which case there's nowhere up to go.
The zoom lens on a projector is a simple optical magnification. By increasing the zoom, you increase the size of the pixels in the image, as well as the distance between those pixels. Although Blu-rays are encoded with 1920x1080 resolution, a 2.35:1 movie only uses approximately 1920x815 of those pixels for active picture content. The rest are essentially wasted on letterbox bars. Zooming may lead to visible pixel structure in the picture (an artifact known as "Screen Door Effect"). Again, the severity of this will depend on the size of the screen, the room environment, and the projector.
 |
Anamorphic Lenses – Horizontal & Vertical
As an alternative to the Zoom Method, a CIH user may place an anamorphic lens in front of the projector. This lens will convert the 16:9 video output from an HD projector into a Scope shape. Anamorphic lenses are divided into two categories: horizontal expansion or vertical compression. Both types achieve the same desired result, just using different methods.
A horizontal expansion lens will stretch the 16:9 picture sideways into the proper shape, while a vertical compression lens will squeeze it from top to bottom. The choice of lens will be determined by the projector's distance from the screen and native throw ratio. Different installations will have different requirements. Regardless of how you get there, you wind up with the same picture geometry. For illustrative purposes, all of the following examples will demonstrate the horizontal expansion method.
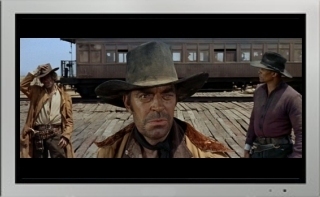
Naturally, you can't simply stretch or squeeze a projector's output and expect it to look correct on the screen. In this example from 'Batman Begins', we'll start with the 2.35:1 letterboxed image as it's encoded on the Blu-ray:
 |
Next we add the horizontal expansion lens, which will optically stretch the picture to fill the Scope screen. The result still has letterbox bars, and the movie picture is geometrically distorted. No one would want to watch the movie this way.
 |
Finally, we scale the image to electronically stretch it vertically. This will restore the proper picture geometry and crop off any letterbox bars.
 |
The combination of an anamorphic lens and scaling has several advantages. First, cropping off the letterbox bars eliminates any light spill above and below the screen. This method also utilizes the entire 1920x1080 pixel panel of a 1080p projector, thus maintaining high brightness and compact pixel density.
The biggest negative to this process is that anamorphic lenses are usually very expensive. A proper home theater lens requires precision optics to avoid problems like focus issues, pincushion or barrel roll distortion, vignetting, and chromatic aberration. Any sacrifice in the quality of the optics can lead directly to a sacrifice in image quality, which will be all the more obvious on a large projection screen. At an MSRP of $3,495, the Panamorph UH480 is one of the more affordable anamorphic lenses for home theater. The UH480 is a physically bulky object to place in front of a projector, but I can personally testify that it's a very high quality lens. Competing products from companies like Schneider Optics and ISCO offer smaller form factors at even higher prices.
The act of scaling the 1920x815 portion of a Blu-ray's video to use the entire 1920x1080 pixel grid won't add any real picture detail to the image. The increased resolution is created by interpolation (copying portions of existing pixels to create new composite pixels). Some will argue that the scaling process may add artifacts or soften the image. The lens itself may also slightly soften the image, by virtue of the fact that you're adding more layers of glass into the light path. However, in my experience, these aren't significant concerns. With a good scaler and a good lens, you should be able to project a very sharp and pleasing picture.
What Else Do I Need to Buy?
As if the projector, screen, and anamorphic lens weren't already enough of an investment, you should now consider adding a video processor to your signal chain. As I just mentioned above, when you use an anamorphic lens, you'll need to compensate for the optical stretch by electronically scaling the video back to its proper proportions. These days, many newer projectors offer special 2.35:1 scaling modes that will perform this vertical stretch for CIH. However, if your projector lacks that feature, you'll need to do the scaling externally.
In fact, even if the projector comes with a CIH scaling option, you'll likely still want to add a video processor. The next few sections of this article will describe a host of complications that Scope screen owners will encounter when watching movies on home video. In order to prepare for any eventuality, CIH viewers need comprehensive aspect ratio control -- the ability to zoom, shrink, or reposition a movie image around the frame to fit on their screens. It's extremely unlikely that any projector (nor DVD/Blu-ray player, nor A/V receiver) will offer that much custom aspect ratio manipulation built-in standard.
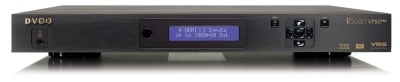 |
I've been using the DVDO line of processors from Anchor Bay Electronics for years. Frankly, I can't imagine living without my current iScan VP50PRO unit. At a $3,499 MSRP, this is another expensive piece of hardware, but it adds an invaluable amount of control and flexibility to a CIH installation. (Unfortunately, the company's newer, more affordable Edge processor has a less comprehensive aspect ratio feature set.)
A good VP will also bring other benefits to a home theater, such as high quality deinterlacing and upconversion of standard-def content, but those fall outside the scope of this article.
Although I'm partial to the DVDO line, Lumagen sells comparable products that have an equally strong reputation.
How to Handle Narrower Content
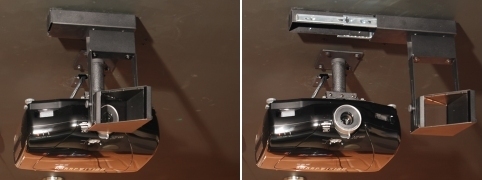
With an anamorphic lens in place for CIH, there are a few possibilities for dealing with video content less than 2.35:1 in shape. In the first, you may remove the lens from the projector's light path and turn off any scaling. That sounds easy enough, unless you ceiling mount your projector. In that case, you'll have to attach the lens to a slide mount. In a really fancy installation, the slide mount can be automated to move the lens off to the side as soon as you enter an appropriate aspect ratio command into a video processor.
 |
It's also possible to buy an anamorphic lens with a "passthrough" mode for 16:9 material, which will reposition the angle of the glass to effectively turn on or off the optical stretch. However, such lenses may sacrifice image quality at both aspect ratios, in comparison to fixed lenses. As you can imagine, attempting to optimize the optics for multiple stretch settings tends to introduce some measure of compromise to each.
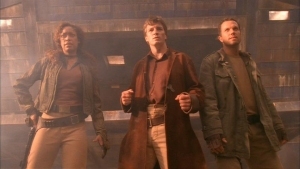
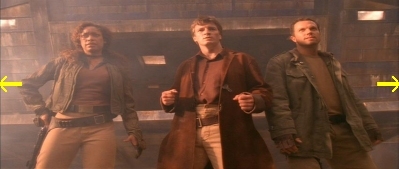
The final option is to leave the lens in place at all times, and scale the video to occupy a smaller portion of the screen. Here's a frame from the TV series 'Firefly', which has a 16:9 aspect ratio:
 |
With a horizontal expansion lens in place, the picture will be optically stretched to fill the Scope screen. Not pretty.
 |
Electronic scaling can restore the correct picture geometry, with pillarbox bars on the sides of the frame.
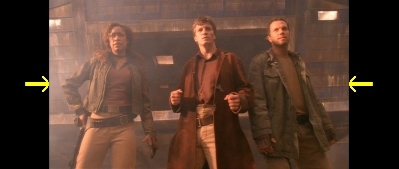 |
Doing so, you've reduced the resolution of the active 16:9 portion of the image from 1920x1080 to 1440x1080. This is a compromise and obviously isn't ideal. Fortunately, our vision is more attuned to vertical resolution than horizontal resolution. Most viewers will probably not find this too objectionable.
The same basic concept applies to other material with aspect ratios less than 2.35:1. The goal is to maintain static top and bottom frame lines. Movies like '2001: A Space Odyssey' and 'Patton', which have a 2.2:1 ratio, should appear with very small pillarbox bars on the sides.
Movies that Don't Fit
We've seen how to tackle material narrower than 2.35:1. Every once in a while, you'll also encounter movies with oddball aspect ratios that don't quite fit onto a Scope screen no matter what you do.
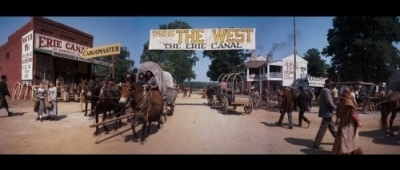
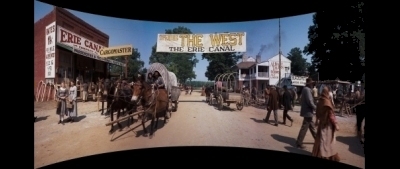
The Blu-ray edition of 'How the West Was Won' includes two separate transfers for the Cinerama film. The standard letterbox transfer has an aspect ratio of 2.89:1. Some die-hard home theater owners may build ultra-wide screens specifically to accommodate rare examples like this, but most will simply project it onto their 2.35:1 screens and live with the small letterboxing.
 |
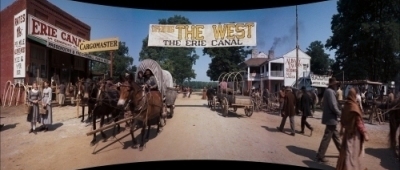
Disc 2 of the set contains a unique "Smilebox" transfer designed to emulate the movie's appearance on a curved Cinerama theater screen. From highest point to lowest, the image measures approximately 1.95:1. This is what it looks like when reduced in size for Constant Image Height.
 |
You can fit the entire Smilebox picture onto the screen this way, though the reduced size loses some of the immersive quality intended by the Cinerama process. As a compromise, some viewers may decide to zoom the picture to fit the width of the Scope screen, with a bit of image loss in the corners.
 |
'The Dark Knight' is another big challenge for CIH viewers. On Blu-ray, the movie's aspect ratio varies from Scope 2.35:1 (the majority of the film) to full-frame 16:9 for those scenes shot with IMAX cameras. The transitions are very abrupt and sometimes only last a few seconds in length. The only way to see the entire picture is to watch the disc in 16:9 mode. Sadly, that will greatly diminish the impact of the 2.35:1 footage.
The 35mm theatrical prints for 'The Dark Knight' were projected at a consistent 2.35:1 with no shifts in aspect ratio. (The image size only expanded in IMAX theaters.) Director Christopher Nolan composed all of the IMAX footage loosely so that it might be cropped on the top and bottom for those prints. The DVD edition follows the 35mm model and has no changes in ratio. As such, Scope screen owners should be safe to do the same with the Blu-ray. They can enlarge the 2.35:1 portion of the frame to fill their screen widths, and cut off anything above or below. The resulting composition may look tighter than the IMAX framing, but shouldn't lose any important picture information.
 |
At least, it should be safe for viewers using an anamorphic lens configuration. Those using the Zoom Method will find portions of the movie image projected onto their walls above and below the screen, where normally they would only have to deal with black letterbox bars. In this case, some form of electronic blanking (either in the projector or a video processor) will be needed to black out those parts of the projected picture.
The Subtitle Dilemma
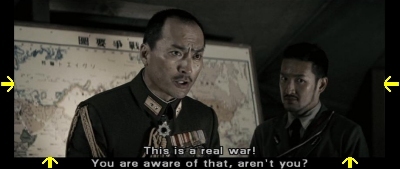
By far the biggest obstacle to Constant Image Height enjoyment comes as the result of complete ignorance and apathy by the home video studios issuing their movies on DVD and Blu-ray. Imagine the frustration of sitting down to watch a foreign-language film and discovering that you can't read the subtitles, because only the top line of text in any given scene is visible. This happens time and time again when disc authors position their subtitles in the lower letterbox bars of Scope movies.
 |
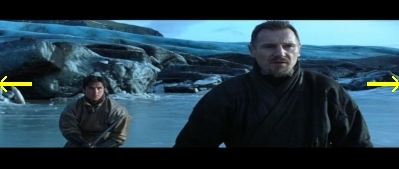
The above scene from 'Letters from Iwo Jima' is perfectly fine on a 16:9 HDTV. But look what happens when you zoom the Scope image to fill a CIH projection screen.
 |
Now the movie is unwatchable. Thanks a lot.
With standard-def DVD, there are a few DVD player options (mostly software-based) that can reposition subtitles higher in the frame. Sadly, that isn't possible on Blu-ray, which has a protected video path.
So, how do you watch the movie? You can shrink the picture down to 16:9 mode and watch it windowboxed into the center of the 2.35:1 screen, but that's hardly an acceptable solution.
 |
The best available compromise will require a video processor. The first step is to reduce the picture to somewhere between 2.15:1 to 2.20:1 size on the screen. Next, shift the image upwards so that the top of the movie is flush with the top of the screen. This will leave you with small black bars on three sides of the frame. Draw your curtains or masking in to hide the bars on the left and right. The lower bar should be just large enough to fit the subtitle text.
 |
The exact size of the image will vary depending on the movie's precise aspect ratio and the subtitle font, so some experimenting may be necessary with each disc. It's not an ideal solution, but it's the only way to maintain a large movie picture and still have readable subtitles.
Some studios (like Universal) are usually pretty good about authoring their discs with CIH-friendly subtitles inside the movie picture. Others (like Sony and Warner) consistently place their subtitles in the letterbox bar. Fox's release of 'Day Watch' actually has subtitles in both the lower and upper letterbox bars for no good reason whatsoever. I find this whole situation absolutely infuriating. All it would take is a few clicks of the mouse for the disc authors to shift the subtitle positions into the picture and eliminate this problem forever.
[January 2010 update: CIH viewers finally have a viable solution to the subtitle position problem. Thus far, two hardware manufacturers have released Blu-ray players that can defeat the protected video path and allow the user to manually adjust subtitle position up or down on the screen. See my CIH follow-up article for further details.]
The Future of CIH
The question is often asked whether hardware manufacturers will ever make displays with native 2.35:1 pixel panels, to avoid the need for anamorphic lenses. Thus far, there hasn't been any progress on that front for projectors, even though it seems like a logical next step for a high-end brand.
On the other hand, Philips has taken the bold step of producing the world's first Scope-format LCD HDTV, which they're calling Cinema 21:9.
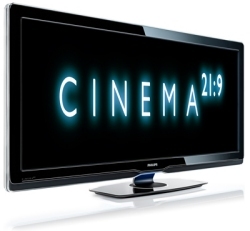 |
The set is scheduled to debut in Europe later this year, but there's been no word of an American release. It's certainly an interesting concept, but I have to think that the Scope format will be rather impractical for a TV. The pillarbox bars will be quite significant on 4:3 content. You can get away with that in front projection due to the size of the image, but it will be very distracting on a smaller screen. We'll just have to wait to see how successful the product launch is.
The Bottom Line
Some viewers will find the Zoom Method to be the most practical and cost-effective option for implementing a CIH system. Others will find benefit in adding an anamorphic lens. The specific conditions of each person's room environment and equipment chain will dictate the appropriate choice.
Make no mistake, Constant Image Height projection is not for everyone. It's a complicated and frequently expensive process, with a number of potential stumbling blocks. Yet, when it's done right, there's simply no better way to capture the true spirit of the home theater hobby.
Joshua Zyber's opinions are his own and do not necessarily reflect those of this site, its owners or employees.
See what people are saying about this story in our forums area, or check out other recent discussions.
The latest news on all things 4K Ultra HD, blu-ray and Gear.