HDR tone mapping remains the most confusing and frustrating aspect of 4k High Dynamic Range video, and is especially difficult on home theater projectors. Always at the forefront of the best projector image quality, JVC has issued a firmware update for its current line that may not completely solve the problem, but comes pretty close.
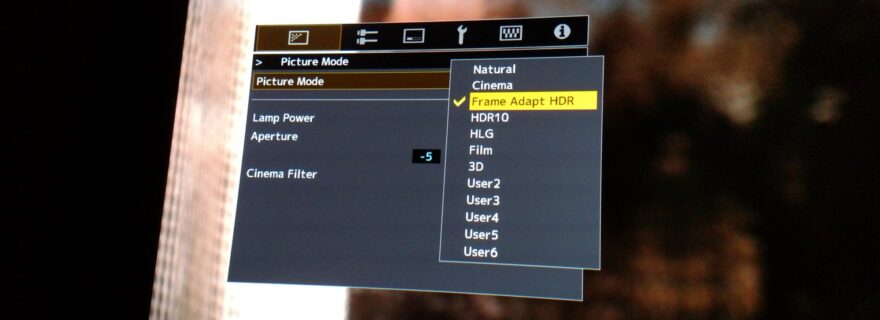
Due to production issues that caused significant delays for its 2018 projector lineup, JVC has elected not to release any new D-ILA models in 2019. The DLA-NX5 (a.k.a. DLA-RS1000), DLA-NX7 (RS2000), and DLA-NX9 (RS3000) will remain in production for another year. Instead of replacing them, the company has focused on continuing development on those models in the form of firmware updates. Released last week, firmware v3.10 (download here) adds a new feature called “Frame Adapt HDR” that’s such a noteworthy improvement, it almost feels equivalent to upgrading to a new model – and it’s free for owners!
I may not go so far as to say that the feature is perfect right out of the gate, but Frame Adapt HDR is a major development that pushes JVC way ahead of any competing projector manufacturer. Expect other brands to rush to build and implement knockoffs of it as soon as they can figure it out.
I’ve written previously in this blog about how problematic HDR tone mapping is for projectors. Earlier this year, JVC teamed with Panasonic on a feature called HDR Optimizer that helped somewhat but was still reliant on 4k Ultra HD Blu-ray discs having accurate metadata to report average and peak brightness levels. Unfortunately, many discs (possibly even most) have inaccurate metadata or none at all. The HDR Optimizer required the purchase of an expensive Panasonic UHD Blu-ray player to pair with the (also expensive) JVC projector, and could only be used on UHD Blu-ray discs, no other video sources. While most people who invested in it found HDR Optimizer useful, the process certainly had its limitations.
No offense to Panasonic, but I expect that most JVC owners will feel that Frame Adapt HDR makes HDR Optimizer irrelevant. Even users who bought one of those players will likely want to turn the feature off and default to direct HDR output, letting the projector handle all tone mapping itself.
This is especially good news for me, since I chose to keep my OPPO UDP-203 disc player and didn’t want to replace it with another model anyway. Now I don’t have to.
A Couple Nit-Picks
Annoyingly, loading the v3.10 firmware will cause the projector to turn on both Clear Motion Drive (the frame interpolation feature) and video enhancements in the “MPC” menu such as sharpening and Digital Noise Reduction, even if you’d turned all of these off earlier. If you don’t want them, be sure to check that and adjust them right away. If you weren’t aware that this had happened, those features could skew your results and your opinions of Frame Adapt HDR.
The firmware has also caused some minor glitchy behavior where my projector will occasionally get stuck in Frame Adapt HDR mode even after switching back to SDR video content. It’s supposed to detect the change in format and automatically switch settings, but that doesn’t always happen and the image on my screen will look terribly oversaturated and ugly. Manually changing to the “Natural” picture mode when SDR content is playing will reset this for a time (and restore auto-switching), but the problem may recur later. Other owners have experienced the same issue. I’ve read a claim that performing a factory reset will stop this from happening, but that hasn’t yet been confirmed as a permanent fix at the time I’m writing this. I suspect that JVC will eventually issue another firmware update to address this.
Neither of these is a deal-breaker by any means. For the time being, just be aware that they may happen.
What’s It Do?
Unlike flat panel TVs, home theater projectors are not compatible with the Dolby Vision or HDR10+ formats, just standard HDR10. Until now, all tone mapping in projectors (the method by which an HDR signal is adapted to fit within the limitations of the display) was a static process that could only apply a single tone map curve to the content being watched, but was incapable of modifying the curve on a scene by scene basis as may be needed. This left most viewers struggling to change their HDR settings movie to movie (or scene to scene!) until the picture looked acceptable. A setting that might look best for one scene could leave another looking either too dim or too washed out.
In a best case scenario (like HDR Optimizer), either the disc player or the projector might use the metadata from the source as a guide for what tone map curve to apply. When it works right, this may result in a pretty good picture. However, the metadata only tells the average and peak levels, and doesn’t account for swings or variances in specific scenes. Worse, some major studios like Disney and Fox (homes of all the Marvel, Pixar, Disney Animation, Star Wars, and X-Men franchises, to name just a few) don’t provide metadata at all, leaving it totally up to the viewer to guess what curve to use on any given piece of content.
Metadata is not needed for Frame Adapt HDR. Instead, the projector can now analyze the incoming video signal and dynamically adjust the tone mapping on a frame-by-frame basis to choose the right levels for every scene. That’s very similar to what Dolby Vision and HDR10+ do, except that the mapping decisions are made by an algorithm rather than a human being. All things considered, letting a human artist make that decision is probably better, but this is at least the same fundamental concept, and it’s a big improvement over static curves.
Better yet, it works on any 4k HDR content you feed it, not just movies on disc.
How’s It Look?
In the new Frame Adapt HDR submenu are three possible levels – Low, Medium, and High – as well as an Auto setting that is supposed to use metadata (when available) to choose the appropriate level. Low will tame the brightest content, while High will brighten the dimmest. Your screen size and projector brightness may also play a part in which setting you prefer.
Of the content I’ve watched so far, the Auto setting has done a pretty good job of gauging which level to use for the most part. I’ve left that as my default, at least for the time being. The first thing I watched in full was El Camino: A Breaking Bad Movie on Netflix, which looked absolutely fantastic, perhaps some of the best HDR I’ve ever seen on this projector. In fact, until now I’d felt it necessary to use the projector’s high lamp mode with HDR content in order to give image highlights a boost, but El Camino was so bright and dynamic even in low lamp mode that I was nearly convinced high lamp isn’t needed anymore. That would be great news, as using low lamp would extend my bulb life, reduce fan noise, and improve black levels.
Other material I played left me less certain of that decision. Bumblebee and The Shape of Water looked very good with Frame Adapt HDR set to Auto, but the image in low lamp wasn’t tremendously different than the HD SDR versions of each on regular Blu-ray. High lamp brought an extra kick of vibrancy to the highlights and colors of both.
The original Blade Runner left me conflicted. All the neon street signs benefited from high lamp, but the black levels of shadows suffered a little. I think I need to do a lot more testing before making a final decision about lamp power. I tried low lamp with HDR level set to High, but while that does make the picture brighter, it also flattens it out a bit and occasionally clips highlights. I don’t think what amounts to gamma manipulation is quite a substitute for pumping more light through the lamp.
Regardless, the Auto setting for Frame Adapt HDR did an excellent job of tone mapping all four movies. However, I’m not sure that any of them is really a challenging test for the feature, given that they all looked pretty good prior to the update as well.
Next, I went to some material that I’d previously found unsatisfying. Netflix’s The Spy is a very brightly photographed show with many scenes in the harsh desert sun. Using JVC’s former “Auto Tone Map” option (which was a static mapping curve based on metadata), the HDR image badly crushed detail in highlights, whereas the SDR version (while still bright) had more detail and virtually no clipping. Episode 3 at time codes 28:30 to 28:45 is a good example; the white shirt that Sacha Baron Cohen’s character wears was very blown out in HDR before. Sadly, it still has some of this issue with Frame Adapt HDR set to Auto. Toggling through the options manually, all of the image detail comes back with Frame Adapt HDR at Low level, but clips again at Medium or High. Low looks best not just for that episode, but the entire series. Yet the Auto mode appears to select Medium instead.
Amazon’s Carnival Row has the opposite problem. This show is very dark by design, and both the Low and Medium settings are unwatchably dim on my screen. Only High raises the average brightness to a comfortable level. Once again, Auto seems to choose Medium for this series.
While it’s disappointing that the Auto setting is a little erratic and not always reliable, the fact that I could get a good picture by manually switching to Low or High when needed is already a big improvement over the projector’s previous implementation of HDR, which blew out the details in The Spy no matter what I did.
I wish I could say as much for Starship Troopers. That Ultra HD Blu-ray disc still looks awful no matter what tone map settings I try. The picture is far too bright with clipped highlights all over the place. During the high school football game near the beginning of the movie, the white helmets and uniforms are crushed to oblivion even in Low HDR mode. The contrast boost also exaggerates grain and makes the image look noisy as hell. I’m inclined to say that this is just a bad video transfer, but I really wished that the dynamic tone mapping could have worked some sort of magic on it. No such luck.
Fortunately, even with these exceptions noted, most of the content I’ve tested so far looks either good or great in Auto HDR mode, which I’ll leave as my default and adjust as needed. Thus far, Starship Troopers is the only thing I’ve watched that Frame Adapt HDR couldn’t do anything with.
The Verdict
Even with frame-by-frame analysis of the video, manual intervention is still occasionally needed on a case-by-case basis, and it’s disappointing that we can’t fully get past that. However, Frame Adapt HDR makes the process much easier and delivers much better results than JVC’s previous static tone map settings. Every 4k home theater projector needs something like this. Once more people experience it, Frame Adapt HDR (by whatever name other manufacturers choose to call it) will soon become a must-have feature in every model going forward.
Does that mean it’s a flawless, end-all/be-all solution for tone mapping? Of course not. As I said, I really wish we could get beyond the need for manual tweaking. Also, just because the algorithm now adaptively analyzes the video doesn’t necessarily mean that the tone mapping decisions it makes will always be perfect. Users who have invested the money and/or time in external tone mapping solutions such as a Lumagen Radiance Pro or MadVR may still get better results. (MadVR advocates are very adamant about that product being a world-beater, but I haven’t experienced it yet for myself. I’d love to see if it could fix Starship Troopers.) Nevertheless, Frame Adapt HDR is decidedly better than the majority of other tone mapping features available in projectors or UHD players, and it does a good enough job that I believe it will satisfy the needs of most users without adding any complicated or expensive equipment to pair with the projector.
JVC has long had a reputation for making the best home theater projectors on the market. With Frame Adapt HDR, the company proves that it isn’t resting on its laurels.


Shunil Jacob
Thanks for the review. I just noticed the firmware update and based on your comments may give it a shot this evening. That said, it’s my friend’s NX7 projector (which I set up) so I’ll confirm with him first; however, it’s nice to know that JVC is continually working on this issue. Most content played over here is played through the Apple TV 4K using Netflix, Amazon, or 4K played using MrMc. Some is also played using the Cambridge UHD player.
Shunil Jacob
FWIW, I ran the firmware update on the NX7 and so far so good. I did notice a glitch when I went from a 4K HDR source to standard HD. The screen looked like it was at a much lower resolution (very blocky). I even did a factory reset before this happened. Ultimately playing back 4K HDR media fixed the problem for that time although I’m sure it will come back. Image quality seems solid although more testing is required. So far the auto settings seem fine w/ Frame Adapt HDR in high output, manual aperture, and wide color. Anyway, other than this one glitch, things seem to be working well. Thanks again for your review, it was very helpful.
Robert Zohn
Great write-up Josh! Thanks for covering this.
Just one comment, is that JVC engineering is still recommending paring the NX5/7/9 aka RS1000/2000/3000 with Panasonic’s UB820 and preferably with the UB9000 and engaging the HDR Optimizer set to Basic Luminance Projector for the best 4K HDR tone mapping performance.
Josh Zyber
AuthorThat’s very surprising to hear. Most of the reports I’ve read where people have compared HDR Optimizer on and off with JVC’s Frame Adapt HDR have said that the results are better with it off.
Shunil Jacob
Makes sense. I think the Frame Adapt HDR may be ideal for all other sources. btw, i saw a nice SpareChange video of your store showing off the Panasonic and JVC NX9. Looked promising for addressing the 4K BD inconsistency issues.
Biff Lomax
I was a projector user for years with DVD and Blu-ray but not for UHD. They simply cannot match a panel. The idea of fussing with picture settings for each movie means there is something wrong. Sure you gain a bigger picture but that’s about it.