

As we last left off on the HTPC discussion, I described the various parts needed to build a sturdy machine. After putting everything together, I must say that I’m very pleased with how my HTPC turned out and how beautiful it looks alongside the rest of my home theater setup. The next step is configuration and installation of the programs needed for video and audio playback, followed by the software that will customize the look of my new media center. This is arguably the best and most fun aspect of the entire process.
As I mentioned before, Assassin’s HTPC blog is an invaluable guide for this. The small price you pay for his step-by-step tutorial is practically nothing compared to the stress and headache you’ll save yourself. He provides pretty much everything you’ll need to know for making your HTPC function at its very best. From configuring BIOS and adding new hard drives, to ripping your movies and recording live TV, those not intimately familiar with computer hardware and software will be greatly indebted to Assassin’s guidance. (Because of the amount of time he clearly put into this, I won’t share any of his secrets. You’ll have to visit his blog.)
The main program used for movie and music playback is Windows Media Center (WMC), which is technically free since it already comes with Windows 7 Home Premium. This works superbly well with another open-source program called Media Browser (MB). There are others available, such as My Movies, Media Portal or MythTV. I also use XBMC on my laptop, just to give me a different window to look at from my dedicated HTPC. It looks pretty cool, but I find navigation a bit awkward, and customization is somewhat limited, which is the same issue with the other programs. I also could have kept things simple by just using WMC as my main player. For me, MB is ultimately the best choice because it’s terrifically user-friendly and allows lots of freedom to customize, which I’ll demonstrate in a bit.
Speaking of players for the PC, there are several options available, from the freebies like VLC and Media Player Classic to PowerDVD and Total Media Extreme. Except for MPC-HC, I really don’t see the need for any such programs on an HTPC – unless, of course, it’s the main Blu-ray/DVD player of the house. It’s a completely personal choice, and my HTPC is really more for storage than disc playback. Meaning, I don’t use it for review purposes. Before I go off on a tangent about a variety of choices, let’s bring back things and focus only on what I did with my machine.
With WMC configured to work with my existing equipment and MB installed, the next part is to develop the overall look of my screen. MB is surprisingly easy to use and comes with a great selection of plug-ins that provide interface themes, cover art, thumbnails and (most importantly) information about each movie and its cast. Some of them are free while others ask for a small donation. I went with a few of the freebies, along with a couple others that I found worth the asking price. For the appearance, I chose the one called “Pearl” and also downloaded an application called “Media Browser Intros,” which allows users to program what to watch, like trailers, prior to the actual movie. It’s a great little tool.
 The default MB background picture is horribly boring and near-depressing. Thankfully, I can change it to literally whatever I want, which in my opinion is what makes the program one of the best — no restrictions, no fuss, no worries. Since my wife and I are huge fans of ‘The Munsters’ and ‘The Addams Family’, I decided to name our little theater “The Munster House.” So, I used a picture of a nice-looking home theater that I found on Google, pasted the TV show’s logo on the screen, and now use it as the main background when MB is turned on. (Pictured above) Things only get better once we start loading the hard drives with some content.
For ripping my Blu-rays and DVDs, I use MakeMKV, which records exact copies of the discs with lossless audio. I actually rip only the movie, audio and subtitles, and ignore everything else. After placing each movie in separate folders, I use another program that downloads the metadata and excellent high-res backgrounds, storing it all within the same folder. When I turn on MB, I see the information and artwork as I navigate the screen. This looks very cool when searching for what I feel like watching.
I also wanted to organize all my movies by genre, box sets and studio (only for Disney and Pixar). At the MB forums, I found a great community that shares custom-made backgrounds and icons for the movie folders. I went with a collection of icons from Xzener and backgrounds by me23. Furthermore, I was directed to a neat program that searches through my library of movies and organizes them all according to genre. I still had to arrange the box sets and studio folders on my own, but the program definitely helped to eliminate some tedious work. If I wanted to, I could apply the same method used for making the startup background, like so . . .


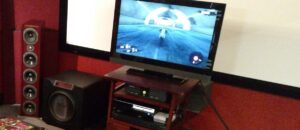
The next two screengrabs were taken while MB was on. I made them special just for Josh because I know how much he actually loves this particular theater.


Organizing the collection and designing the look of MB turned out to be more fun than I could have expected. Being a hands-on kind of person, I absolutely loved customizing the navigation system. The overall appearance, whether I’m surfing the genres or the box sets, is something that I’m very happy with. The real clincher in my opinion is being able to use my Harmony One with the program, thanks mostly to the Windows MCE remote. Logitech already has the settings for that particular piece of equipment in its software, so all I had to do was customize the button settings to my liking.
And so, without further ado, here’s a quick video of what it all looks like when I’m watching a movie using my new, totally-awesome HTPC. It’s all being controlled via the Harmony One, and I’m using music by deadmau5 just for amusement. (The video is supposed to be in HD, but I was having issues with it, so apologies if the quality is bad or if you notice any jerkiness. It’s due to the recording, not actual playback.)
Here’s another look using a different theme called “Chocolate.”


JM
Do you store backups of all your blu-ray rips, to protect against the inevitable hard drive failure?
How long does it take to rip blu-rays, if I wanted to store 2000 discs?
M. Enois Duarte
AuthorI make ISO images of my rips and save them on an external hard drive, just in case. But with an SSD attached, I’m taking the workload off the other hard drives.
I also limit internet use to practically nothing unless it’s really necessary. I use my Boxee for for internet videos and Netflix via HDMI.
As for how long each rip takes, it all depends on your system and the BD drive you’re using. On mine, they can take about 20 mins for a 18-20 GB movie or about 30-40 mins for anything 25 and over.
William Henley
Messing with it now. It looks like the reason it is so fast is because it is not reencoding the video or audio – it is copying the video and audio to an MKV file. This is great for me – its fast, and it means that you are not recompressing video. It also looks like the 30 day free trial is for the Blu-Ray ripping – looks like the DVD ripping features in it are free. This is actually the easiest ripping software I have ever used. The only thing I don’t like is that I am going to have to reprocess one of my DVD rips – its 4×3 letterbox and I want to cut off the borders. Other than that, its great. Awesome program!
William Henley
I guess I don’t really need to crop stuff – my OCD tells me I should, but Media Center has a pretty darn good cropping and upconversion.
Does anyone know in Media Center how to select alternate audio tracks and subtitles? Right now, I have been using VLC if I want to change audio tracks and subtitles cause i can’t figure out how to do it in MC
William Henley
Also, I don’t really see the point of backing up BDRips. If your harddrive fails, just re-rip the disc. As it is pretty much copying the file, it will take about as long to re-rip the disc as it will take to copy it from an exteranl harddrive.
jonstamos
I use FlexRAID to back up my media library. This works the best if you essentially have many drives dedicated to static data. Essentially all you need is one hard drive that is equal to, or larger, then the largest hard drive you need backed up.
http://en.wikipedia.org/wiki/FlexRAID
William Henley
Thanks for recommending MakeMKV. I have just been way too lazy to actually look for Blu-Ray ripping software. This may come in handy. Also may look at MB – Windows Media Center is easy to use and has a good interface, but I was just thinking today about how boring that interface was starting to look.
M. Enois Duarte
AuthorI definitely recommend Assassin’s blog to help in making MB looks its best. The videos above are just two themes I’m tried out thus far, and there are more.
bjmach
If your interested in a Apple setup, mine is pretty awesome as well. Using Plex software and a Mac Mini.
assassin
Looks fantastic! Love some of the personal touches you put on your interface!
M Enois Duarte
Thanks. All possible thanks to your very helpful guides. I’m really loving how easy it is to personalize MB.
William Henley
Hey, anyone tried using MakeMKV with a media streamer? I use PS3 Media Server, and the DVDs I ripped have A/V sync issues, and Blu-Rays have crackling audio. They work fine in the other room with the HTPC and Media Center. Does anyone have any suggestions?
M Enois Duarte
I haven’t tried streaming to the PS3, so I can’t comment directly. Best guess, the PS3 might have difficulty with the MKV container because I believe the machine has a preference for VOB and MP4 files.
You’ll like get a better answer at the MakeMKV forum,
http://www.makemkv.com/forum2/
but a much faster response at AVS forums,
http://www.avsforum.com/avs-vb/showthread.php?t=1302559
William Henley
Thanks! The MakeMKV forum told me the issue for Blu-Rays. In the PS3 Media Server, under the transcoder setting, you need to UNCHECK the optiion to keep the DTS audio track. This forces PS3 Media Server to transcode the audio to AC3 format, which the PS3 seems to perfer.
As to the DVD A/V sync issue, I got it playing back BETTER, but its still not right. What I did was under the MEncoder options, to make sure to check Force Framerate Parsed from FFMPEG (so all 4 options on the lefthand side are checked). Also, under AVISynth/MEncoder, check the option, and under tsmuxer, choose to Force FPS.
Basically, this helped. Before, it seemed like it was playing back a 24fps movie at 60 fps. Now it seems to be playing back around 30fps, but the framerate seems to be inconsistant. Its really weird. Anyways, what I am gathering now is that either MakeMKV is not writing the FPS correctly in the MKV header file, or PS3 Media Server is not properly reading it. Some people in the forums seem to be complaining about FPS issues in different programs, because it seems that MakeMKV uses a compressed header file or something.
Anyways, that is my guess. At least fixing the Blu-Ray issue is fixed. The problem now is that I just really do not have the extra HDD space to rip Blu-Rays. Really hope I can get DVD streaming to work right – you just do not know how handy that would be
William Henley
Hmmm, saw something that MIGHT work, but probably won’t try it tonight. So, pretty much MakeMKV pretty much rips the audio and video from the disc and puts it into an MKV container, maintaining the original quality. Someone was talking that, for space considerations, converting the MPEG2 stream in the MKV to an MP4 and remuxing it. That just might fix my issues, and I actually already know how to do that. I’ll try that in a few days and get back with you.